How many bows do I need to take down a Balrog? How many hobbits does it require to take down an Ent? How many models should I charge into Aragorn to win the Fight? These are the decisions constantly fret as we play the Middle Earth Strategy Battle Game (MESBG).
For a while now, the maths-nerd in me has wanted to explore the maths behind the game, and a few months ago I saw a great post on Reddit that visualised some of the core odds and it inspired me to make my own MESBG MathHammer Simulators, go and give them a go, they're completely free to use!
This article dives into some of the maths behind it, and discusses a few interesting situations and options that arise.
An MESBG Profile #
For those unfamiliar with MESBG, I won't dive into every stat on the profile, but I do want to explain just some of the terms that'll be mentioned throughout the article:
- Fight Value (FV): This is important when a model is in hand-to-hand combat (a Duel) with an enemy. In that case, both sides roll some dice, the single highest die wins. In the case of a tie, the model with the highest Fight Value (FV) decides the winner.
- Shooting Value (SV): If this model can shoot, then this is the number the player needs to roll in order to have a successful hit with it's shot, so a 4+ means the player needs to roll a 4 or higher.
- Strength (S): The Strength defines how likely they are to cause a Wound on an enemy model, after winning the Duel.
- Defence (D): The Defence then counter-balances the Strength, a higher Defence, the less likely a model will be wounded, if it loses a Duel.
- Attacks (A): In hand-to-hand combat, this defines how many dice you roll, so 3 x Attacks = 3 x dice.
- Wounds (W): How many successful wounds need to be made against this model in order for it to be removed from the board.
Then, on the right side of some profiles, are an additional three values, these are reserved for "Heroes" in MESBG and include:
- Might (M): Importantly for this article, Might is a resource that can be spent throughout the game. Most relevant here, Might can be used to increase the value of a die by 1. So, if you roll a 5, but need a 6, spend a single point of Might to increase it.
- Will (W): Will has a couple of uses, much like Might, but most relevant for this article is Magic. Magic in MESBG involves Casting & Resisting. Will is a resource spent to roll dice in these situations.
- Fate (F): Many heroes of Middle Earth have Fate to spend. If they have a Wound caused against them, you can spend a point of Fate for a 50/50 chance at saving the wound and preventing it. Roll a die per Fate point, on a 4+, the Wound is ignored.
The Maths of MESBG Combat #
How a Fight works #
For models to be considered "Engaged in Combat" in MESBG, they just have to be in base contact, so a Fight consist of three key parts:
- Engage: In the Move Phase, one (or more) model move into base contact with an enemy model.
- Duel: Each side rolls the number of dice equal to the number of attacks (A) on their side. The single highest die roll wins, with ties decided by the highest Fight Value (FV). The losing models must then back away 1".
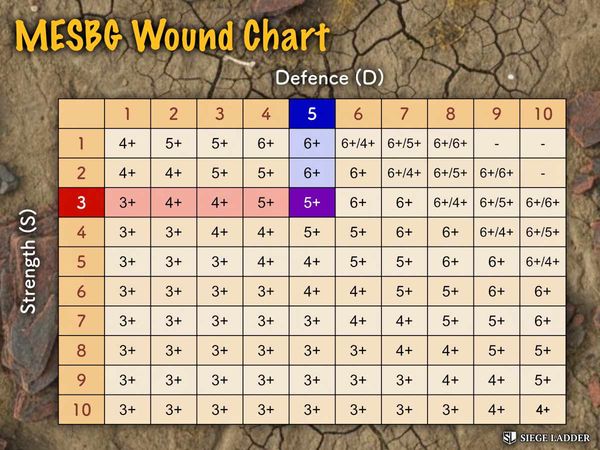
- Strikes: The winner of the Duel then has an attempt at striking their enemy, rolling the number of dice equal to the number of attacks. The number needed is then found by consulting the Wound Chart (shown below), by the attacker's Strength (S) and the defender's Defence (D).
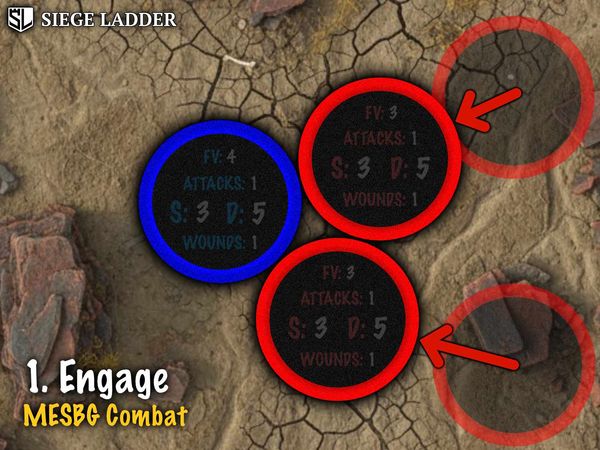
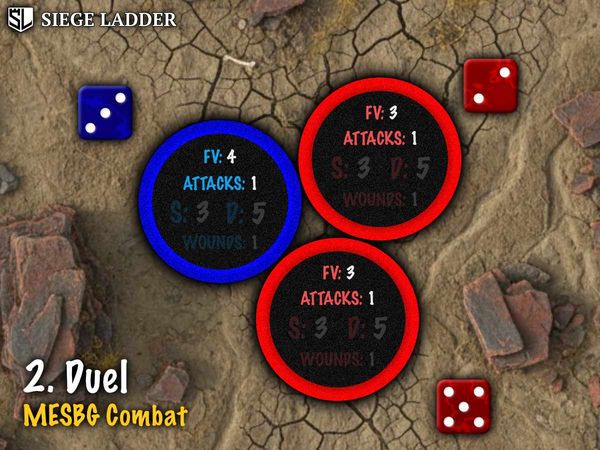
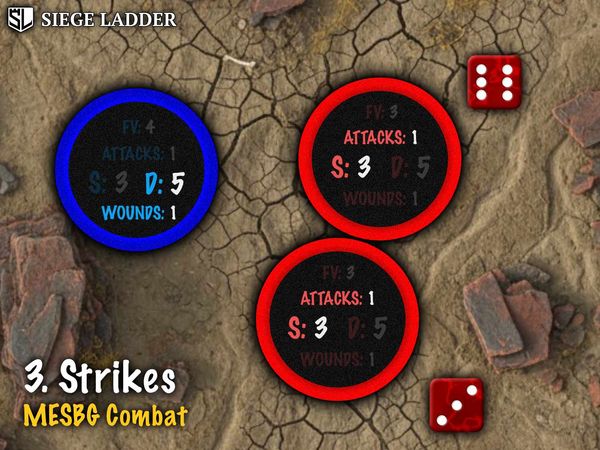
Step-by-step guide to show how combat works in MESBG, with the relevant stats being highlighted at each stage.
In this example, let's look at each stage after the initial engagement:
- Duel: There are 2 x Attacks for Red, 1 x Attack for Blue. Red rolls the single highest number, a 5 and so wins the Duel. Blue must back away 1".
- Strikes: Red's Strength is 3, Blue's Defence is 5, so consulting the Wound Chart, we can see that Red needs 5+ on their dice in order to cause a Wound. Red rolls 2 x dice, one for each model in the Fight. Rolling a 6 means Blue is wounded. With only 1 x Wound in the profile, it is removed from the board.
So, considering the maths here, we have three probabilities to calculate:
- The probability of winning the Duel, p(Win Duel)
- The probability of wounding, if the model wins the Duel, p(Wounding)
- The probability, given the number of Wounds/Fate a mode has, that the Attacks will kill the model, p(Kill)
Probability of Winning a Duel #
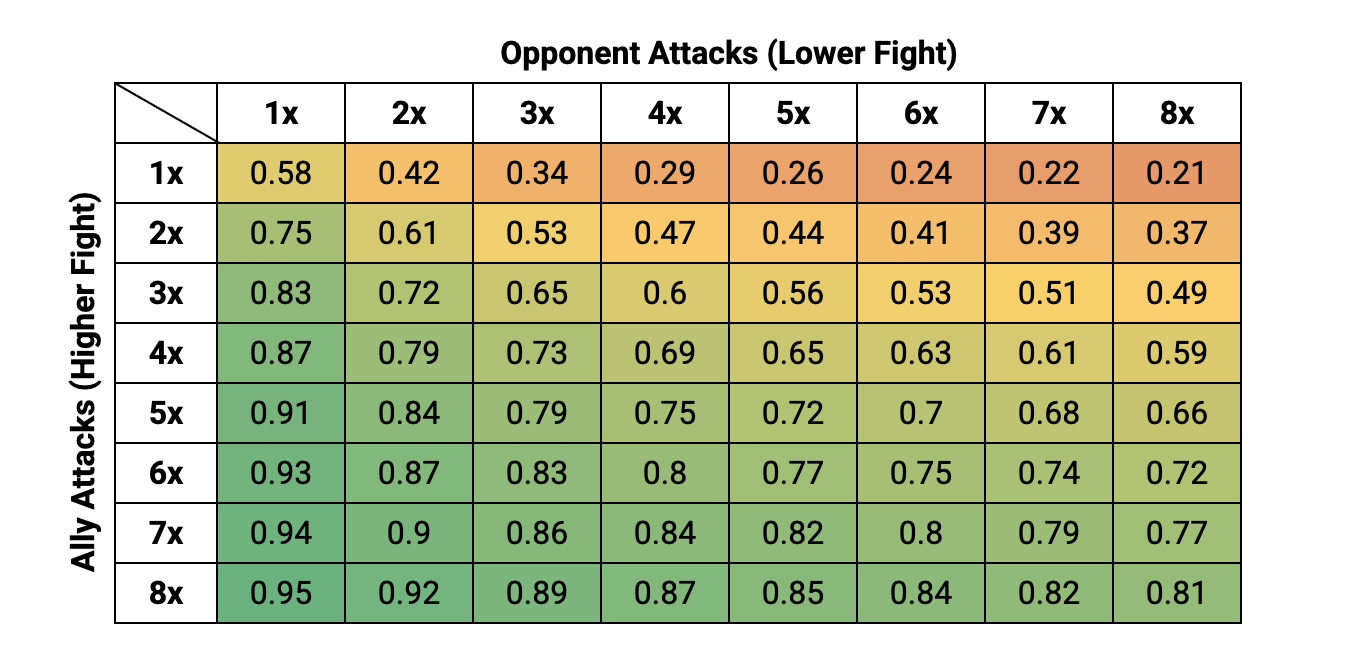
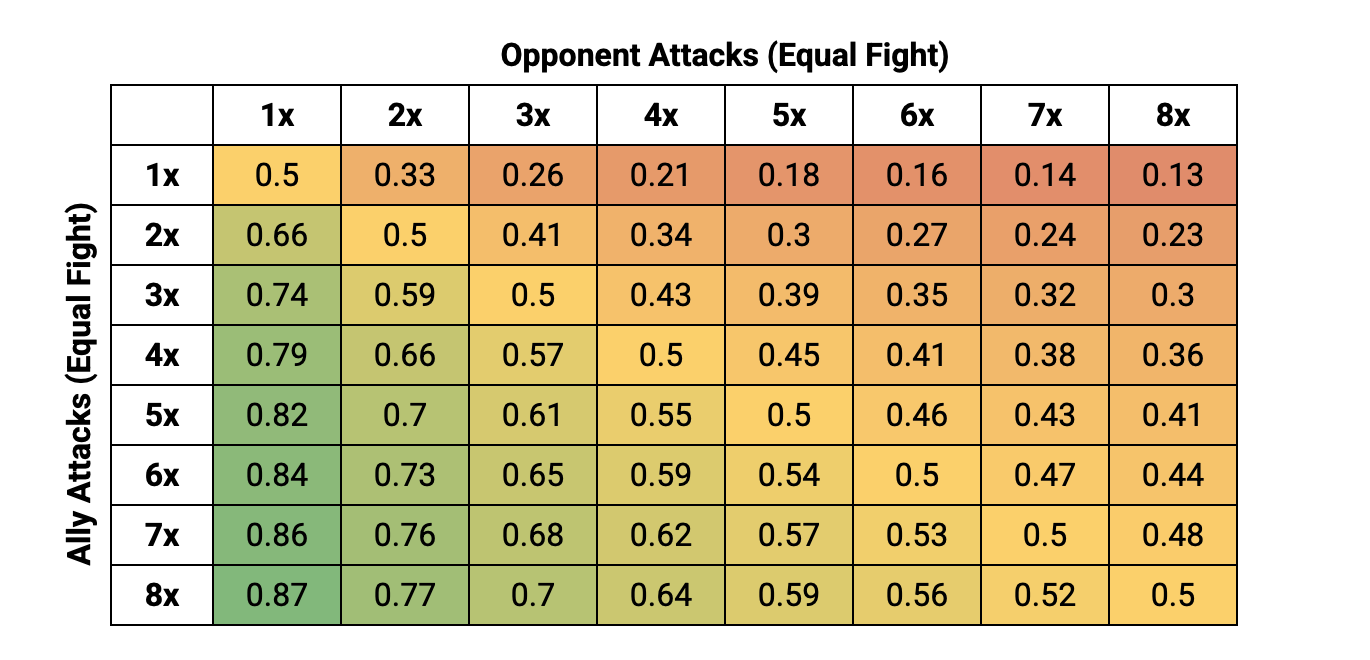
The two important stats here are Fight Value (FV) and Attacks (A). The more Attacks you have, the more likely you are to win, then, if you have a higher Fight than you opponent, then you're also more likely to win the Duel (since you win ties, so rolling a single 6, auto-wins you the Duel).
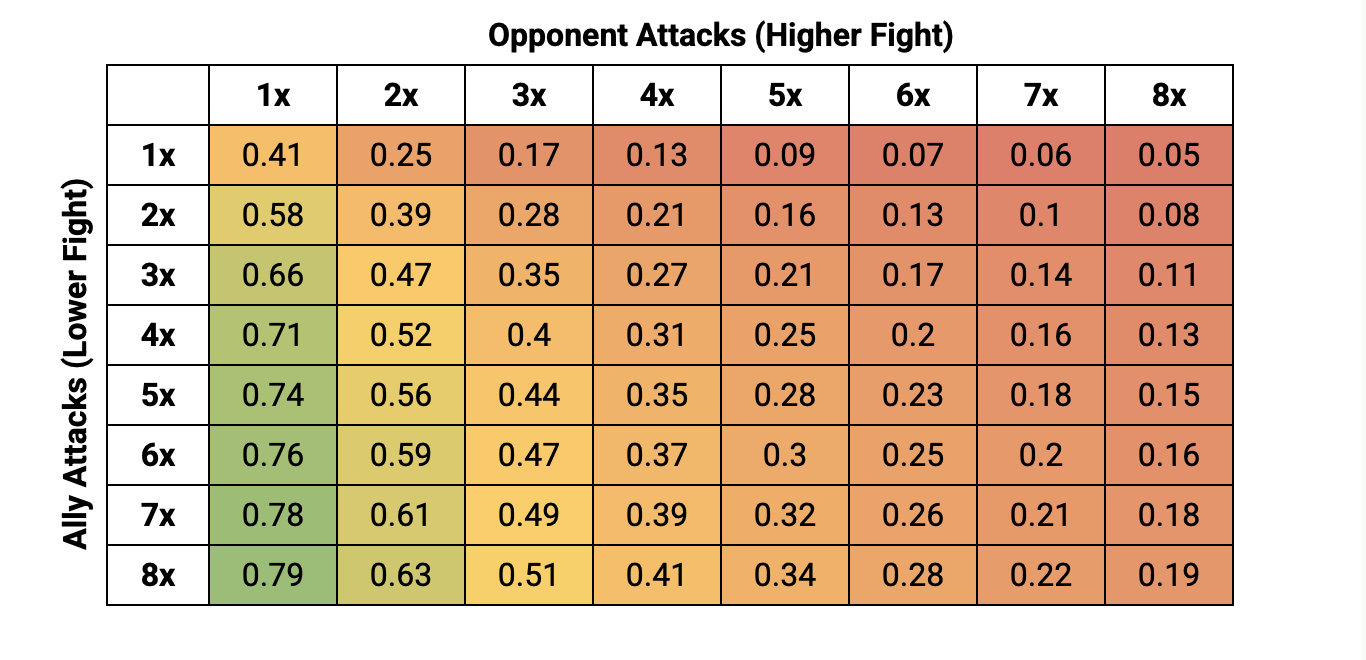
Breakdown of probabilities when attacking against Lower, Equal or Higher Fight Attacks.
I find visualising this data helps a lot more, and really stresses the point of how much impact an extra attack can have. Here, each line represents the number of opponent's attacks, then the x-axis (going from left-to-right) shows the number of attacks you have.
Let's consider a few examples in particular:
- Balrog: On the board, the Balrog is a fearsome and intimidating model. It's Fight 10 and has 4 x Attacks. So, how many lower-Fight attacks do you need to counter that with, in order to stand a 50/50 chance against a Balrog in a Duel (assuming you have no Might too), the answer... more than you can surround him with, in my simulations, I ran 1,000 Attacks for the attacking team, and you still only get a 48% chance of beating the Balrog in a Duel.
- Easterling Phalanx: Easterlings (Fight 4) can line up with 2 x ranks of pike support, meaning when an enemy charges you, you could have 3 x attacks up your sleeve to defence yourself. So, if you charge a lone model in with 1 x attack, it means you have a 17% chance (with lower Fight), 26% chance (with equal Fight) and 33% chance (with higher Fight). Even with a Cavalry Charge (one extra attack) you still only stand a 28% chance of winning the duel if you have a lower fight, up to 52% if you have a lower Fight.
- Mirkwood Rangers (Outnumbered): Rangers have an interesting ability whereby they're given an extra Attack for every enemy they face (as is Tauriel, a hero in that list). The maths here is such that, if you're lower Fight, and going against the Rangers, the more models you put in, the less likely you are to win; 42% in a 1:1, 32% in a 4:1. The trick here is to use Spear support (or use higher Fight models), as the Rangers only get an Attack per model Engaged. Tauriel though, already has 3 x base attacks, and actually, it doesn't increase the odds at all if she faces more opponents (always around 78%), so save your resources and shift them elsewhere.
- Banners: Banners essentially give you an extra Attack when you need it, generally with 3" of the Banner (or 6" in the case of some Heroes). In a standard 1:1, the impact can be significant. With the same Fight, you go from 50% to 65% chance of winning, with a lower Fight, from 42% to a 58% chance of winning, and with a higher Fight from 58% to 74%.
The Impact of Might #
Let's consider Boromir (Fight 7; 3 x Attacks; 6 x Might) charging the Balrog (Fight 10; 4 x Attacks; 0 x Might) in a 1:1 Fight.
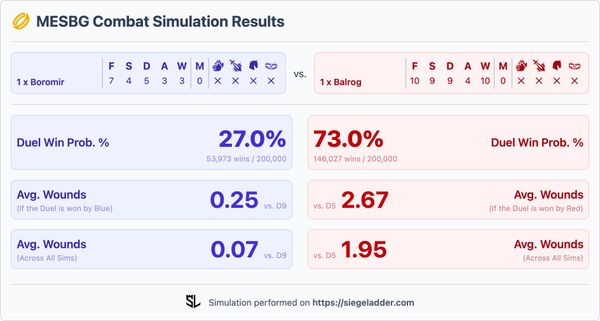
In this case, Balrog has a 73% chance of winning, not looking good for Boromir. However, Boromir has Might, so, let's say he wants to spend some of it to win the Duel, how does that impact the likelihood of him winning:
- Spending 1 x Might: Boromir has a 38% chance of winning the Duel.
- Spending 2 x Might: Boromir has a 44% chance of winning the Duel.
- Spending 3 x Might: Boromir has a 47% chance of winning the Duel.
- Spending 4 x Might: Boromir has a 48% chance of winning the Duel.
The Oliphaunt in the room here too is that Might is an expendable resource, once the Might has gone there are very few situations in which you're able to get that back, so it needs to be spent wisely, especially because just winning the Duel, doesn't by any means guarantee a Kill.
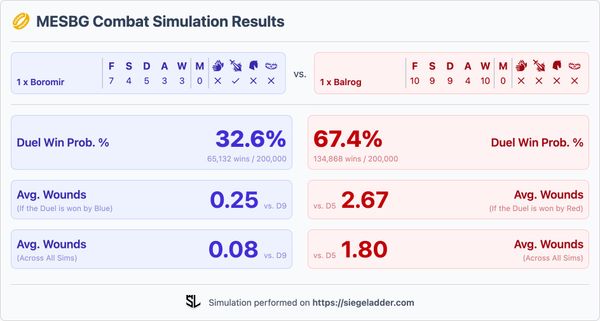
The other option here is to Heroic Strike with your Might, for Boromir in a 1:1 that changes the odds of winning from 27% up to a measly 32.6%, so you're actually better off not Striking at all, and using it to modify your dice roll instead! For a Fight 8 Hero if you're interested, the odds would go from 28% to 43%, so in that case, a Heroic Strike is the smarter play.
Probability of Wounding #
It's all good winning the Duel, but the aim here generally is to Wound/Kill the enemy model. Here, we need to consider the Strength (S) of the winner of the Duel (the Attacker) and number of Attacks (A) they have, compared with the Defence (D) of the loser of the Duel (the Defender).
If we transform the Wound Chart into probabilities, it looks something like this:
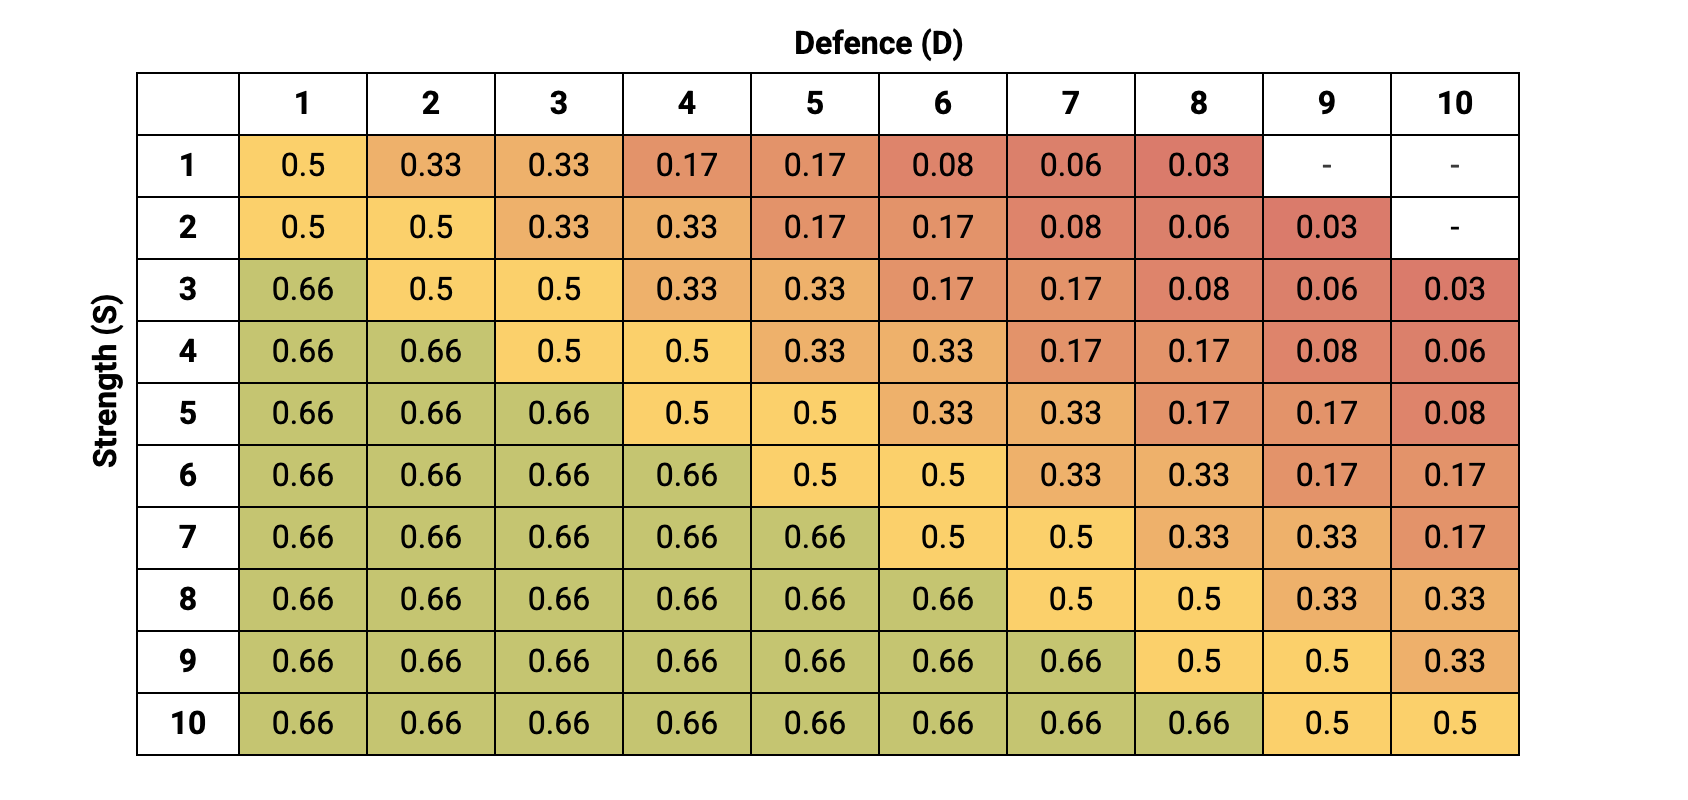
So, in a case where we have a Strength 4 model, striking against a Defence 5, we would expect to do 0.33 Wounds, so if we had 3 x Attacks, on average we'd expect 1 Wound to be successful.
Considering our extreme example earlier of facing the dreaded Balrog, with 10 x Wounds at Defence 9. We would need to put in 12 x Attacks at Strength 4 to average a single Wound. It's at this point you need to start considering Two-Handed Weapons, where you get a +1 to any To Wound rolls. This would mean you do 0.22 Wounds for each Strike, meaning you average a single Wound against the Balrog for every 4.5 Attacks.
I recently faced a Return of the King list without Shields, it was a fairly straight forward win, but it got me thinking, what impact would the shields have had. I was Strength 3 across my main infantry line (Easterling Pikes). With 3 x deep each time with Phalanx, I would be averaging 1 x Wound for every 2 successful Duels I won. If, instead, the Warriors of the Dead had their Shields, I'd have only been wounding once every ~4 x successful Duels. For the cost of 1 point, it seems a no brainer to up to D8 where you can, especially given the vast majority of MESBG infantry lives in that S3 bracket.

Now, we can combine the p(Win Duel) with p(Wounding), so if we take Boromir, Captain of the White Tower (F7; 3A's; S4; D6), against a single Mordor Orc (F3; 1A; S3; D5), then the total probability that a unit will cause a Wound is:
p(Wound) = p(Win Duel) x Attacks x p(Wounding)
In this particular case that would resolve as 0.83 x 3 x 0.33 = 83%. With the counter being that the Mordor Orc has a 0.17 x 0.17 = 2.8% chance of causing a single wound against Boromir, but importantly, still not killing him as he has 3 x Wounds, and 3 x Fate to protect him.
The Maths of MESBG Shooting #
How Shooting Works #
Unlike 40k, where there is a concept of "Saves", shooting in Middle Earth is a tool you can field that the enemy can do very little about beyond positioning their models well. Shooting in MESBG is broken into three steps:
- Roll to Hit: Roll dice equal to the number of shots a model has (generally just the 1, but Legolas with 3, Tauriel with 2 and a few others are exceptions). Of the dice rolled, any values equal to higher than the unit's Shooting Value (SV+) have successfully hit something.
- In the Way Tests: If your model is able to see the entirety of the enemy you've targeting (measured as true line of sight), then you skip this part. However, if there is something obscuring the view, you've got to roll an "in the way" test, a 50/50 chance that you'll hit your obstacle instead.
- Roll to Wound: Finally, similarly to combat, we roll to wound. Any shots that made it through the first two steps are rolled again, needing whatever value the Wound Chart shows when comparing your bow's Strength (S) against the defending model's Defence (D)
"That was such a lucky shot" #
I don't think any MESBG players have played the game, and not heard this at some point, but its the maths behind shooting in MESBG? Well, it's a lot more straight forward that the Combat phase, especially since each shot is only ever a 1v1 (ignoring Siege Weapons & Fire Breathe).
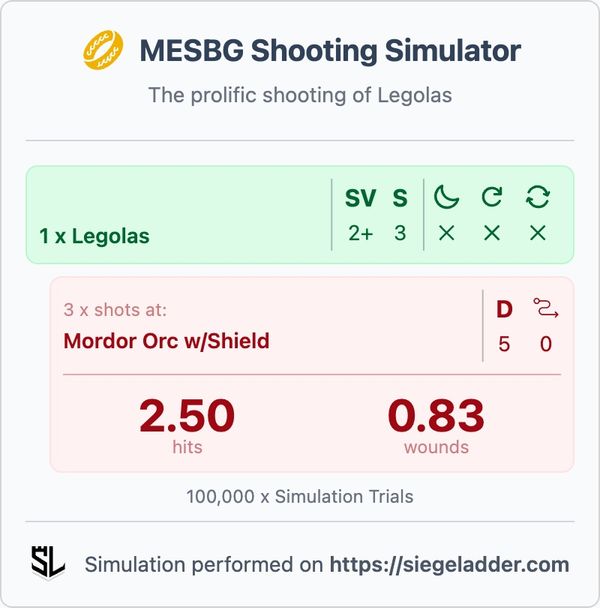
Legolas is considered one of the most prolific shooters in the game, and rightly so, so against a lineup of Mordor Orc Warriors, how many wound should he be getting each round?
Shooting en-masse is the alternative here, and the best infantry for shooting are generally the Mirkwood Rangers, running an equivalent for those, 10 x Mirkwood Rangers could expect to wound 2.22 x Mordor Orcs with a shield each round (assuming no in the ways or movement), that drops to 1.66 per round if every one of the rangers moved (so are hitting on 4+'s instead).
Poisoned Weapons #
There are a few special rules in MESBG that can impact shooting, one of which is Poisoned Weapons, found on Haradrim Warriors and a few others. This ability allows you to re-roll 1's on your To Wound roll, but what impact does that have on your odds? Let's assume we have a lineup of 6 x Haradrim Archers, shooting at a line of Rohan Warriors with Shields.
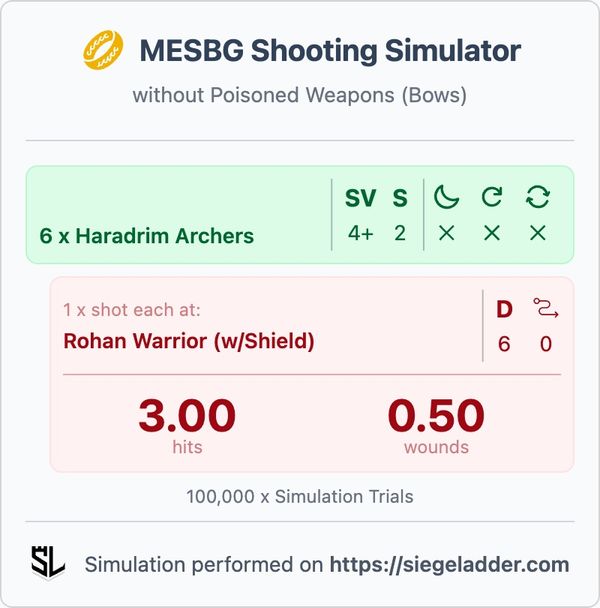

Side-by-side comparison of Haradrim Archers shooting at Rohan Warriors, with and without poisoned weapons.
The impact is fairly minimal, so may not be as powerful/effective as it first seems. On a Mumak though, you can instead equip them with "Rocks" (Throwing Weapons; 8" Range; Strength 6), available as a 20 point upgrade on the Mumak, where the above simulation ends up with 1.50 wounds for the same number of shots.
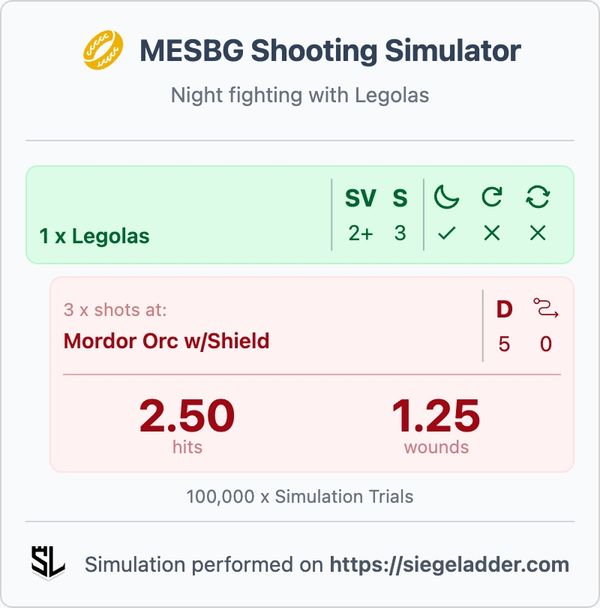
Night Fighting #
Night fighting has become a lot more apparent in the new 2024 edition of MESBG, appearing in more scenarios than the previous edition. It's an interesting rule set, that means you cannot shoot (or even see) anything over 12" away, however, as soon as your enemy is within 12" of you, you're getting +1 to your To Wound roll.
I recently faced off against a Great Beast of Gorgororth in Night Fighting, with 9 shots on it's back (and my opponent actually had 2 x of them), it was a scary prospect, especially given that they don't even suffer the penalty to their shooting for moving over half distance.
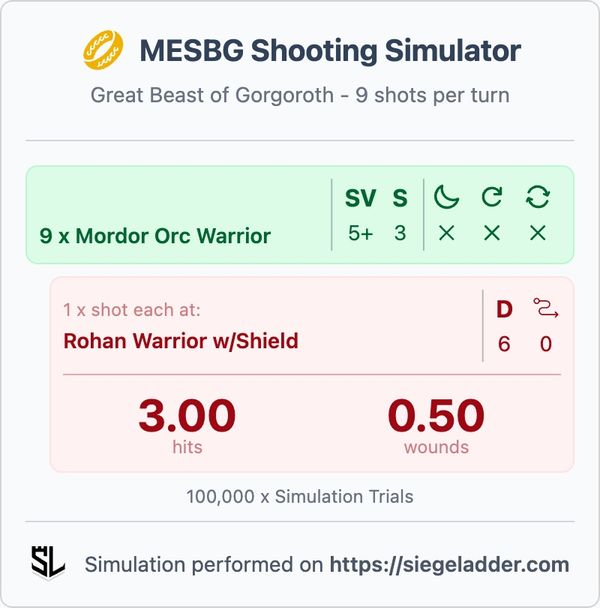
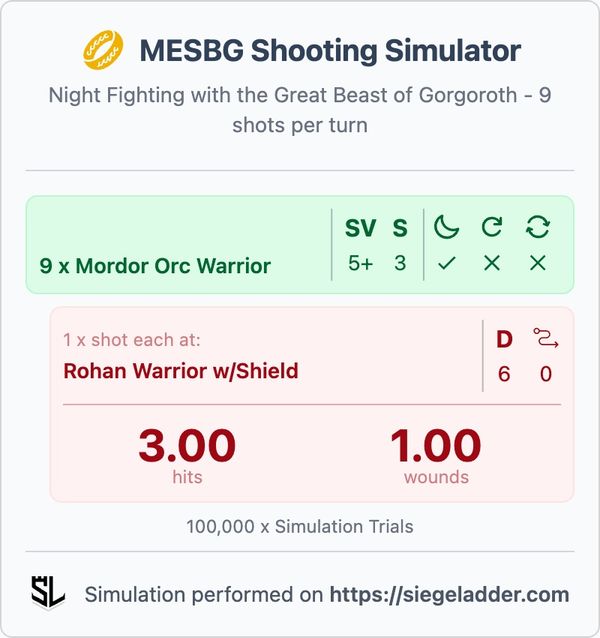
The impact of Night Fighting, with +1's to Wound, demonstrated with the 9 archers on the back of the Great Beast of Gorgoroth.
Even with Night Fighting, on average only losing a single miniature per round, however, this also discounts the other many strengths of the Great beast too, given that it could charge my front line distribute Impact Hit after Impact Hit and still shoot me in addition to that!
How many Hobbits does it take to shoot down an Ent? #
No, that's not a setup for a joke, it's an actual question that I posed at the start of the article, so I feel I have to answer it, any guesses...?
The answer is 144.
At least, 144 archers if you want to take it down in a single round, luckily for the Hobbits, MESBG is a multi-round game, so you've got plenty of chances to fire arrows into the bark of the Ents and take those wounds even if you have less than that.
The Maths of MESBG Magic #
When the new 2024 edition came out for the Middle Earth Strategy Battle Game, it was generally accepted that Magic took a hit. We saw a rise in "Resistant to Magic" rules, and spells like Black Dart (which we'll dive into later) took a big hit too. So is magic still effective, and what is the maths that drives the supernatural in MESBG?
How Magic Works #
Any profile that can perform magic will have a list of available spells it can cast, a Casting Value (e.g. 4+) and a range over which it can perform. For the sake of your maths here, we only care about the Casting Value. The player can then choose the number of dice they want to spend on casting, for each die they use, they can spend one point of Will from their resources. In some case, e.g. if the model has a Staff of Power, they may get an extra die for free.
Once the Cast rolls have been done, any values above the Casting Value are considered successful. Now, the targeted model can Resist. Models can Resist with their own Will, or if they have "Resistant to Magic", they get a free Resist die. The number needed is simply the highest value rolled on the Cast.
So, in an example:
- The Witch King casts a Compel (Casting Value: 3+) with 2 x Will against Beorn. The player rolls a 2 and a 5.
- Beorn has 3 x Will and Resistant to Magic and chooses to spend 1 x Will from his profile and use his free Resist die. He rolls 2 x dice and gets a 3 and a 4.
- The spell goes through, and Beorn is compelled, as Beorn did not roll a number equal to or higher than the Cast roll made by the Witch King.
How much Will should I spend? #
The most common Magic I see is generally a Compel or Transfix, so I thought I'd quickly provide some of the maths for those. The exact spell doesn't matter here, just the Casting Value (e.g. 3+) and whether the enemy is resisting or not.
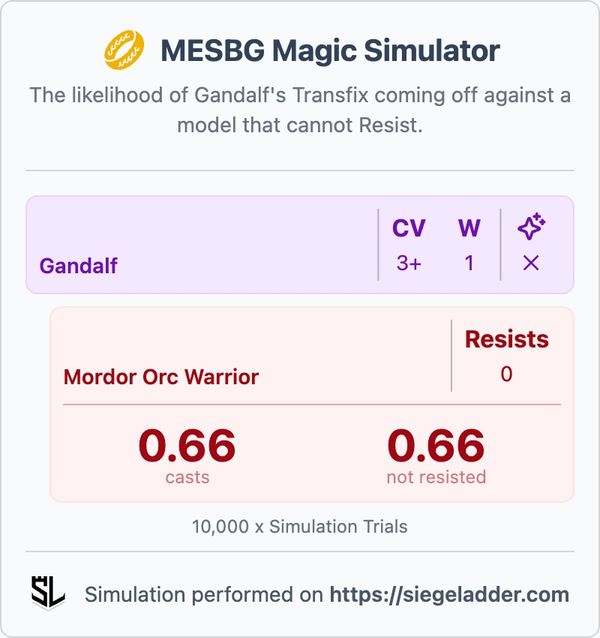

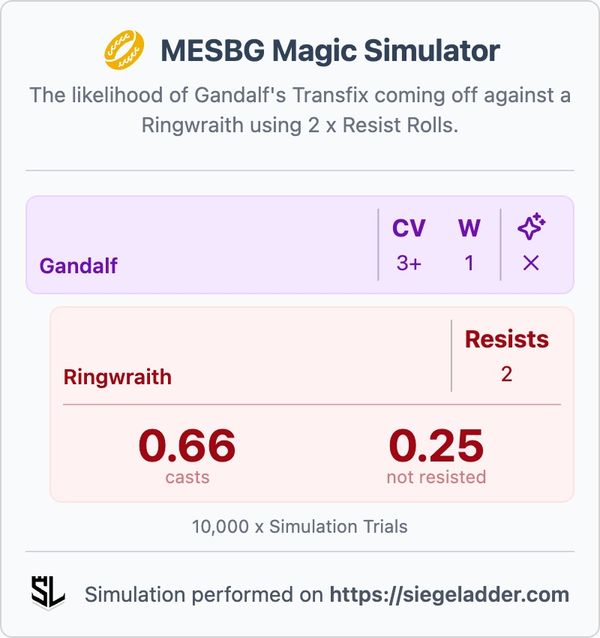
The maths of Casting a with a 3+ Casting Value against models with and without the ability to Resist.
Next, we can consider a spell requiring a 4+ to cast, and how this compares:
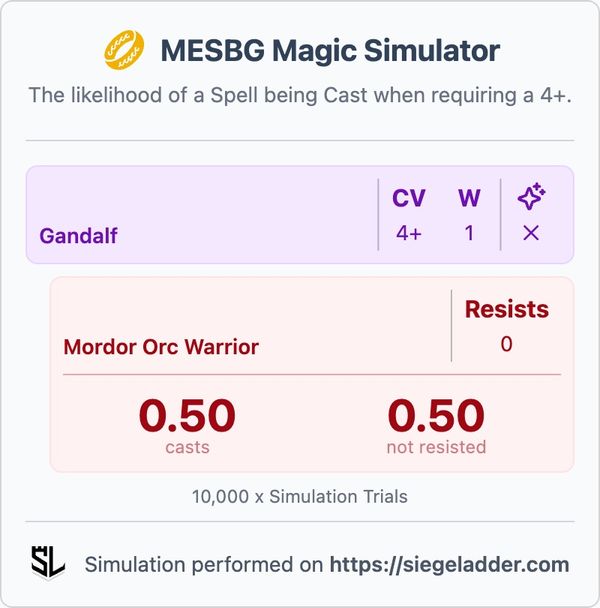
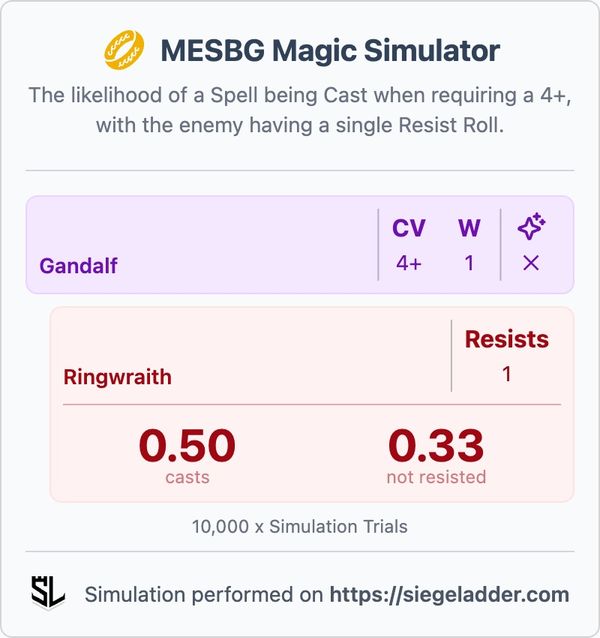

The maths of Casting a with a 4+ Casting Value against models with and without the ability to Resist.
The Ineffectiveness of Black Dart #
Some spells are damaging to their target too, and can cause Strength X Hits, one of which is Black Dart, which was dropped from a Strength 9 Hit down to a Strength 6 Hit in the 2024 changes. In lists for the new edition like Wraiths on Wings, this is their only opportunity at a range attack, so is it worthwhile?
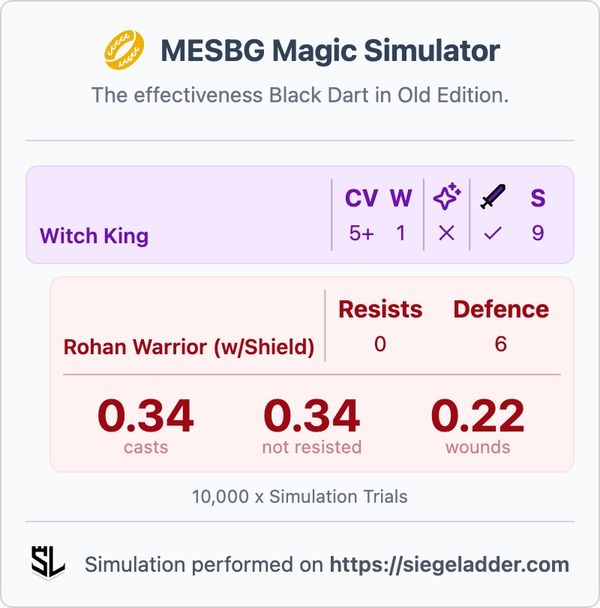
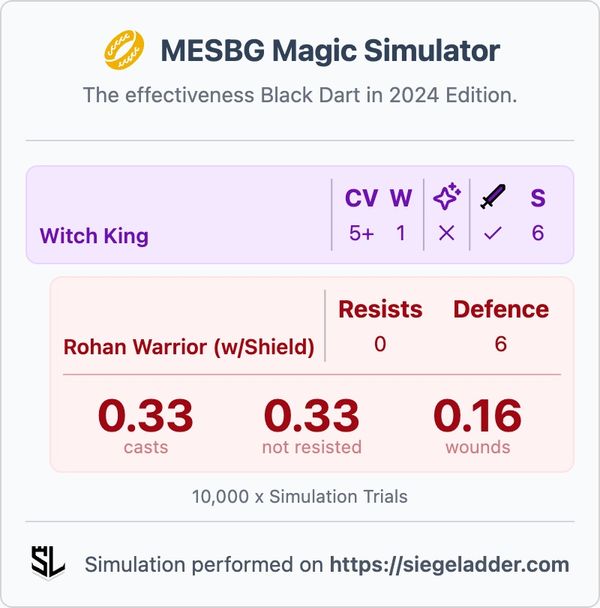
Comparison of Black Dart's effectiveness in the old vs. 2024 edition of MESBG.
Here we can see that Back Dart, against a standard Rohan infantry model (with shield equipped) has gone needing 4.5 rounds to wound, up to 6.25 rounds. That makes Black Dart equivalent to 2 x Easterling Archers (SV 4+; Strength 2 Bows), and in my opinion, just not worth burning the Will on.
Even spending a precious point of Witch King or Ringwraith Might to do a Heroic Channel still only gives you a 50% chance at doing a Wound.
Even if we consider targeting something like Beornings (D4; 2 x Wounds & Resistant to Magic), it's going to cost us 8 x Will/Rounds of Black Dart against a single Beorning infantry model just to remove the single unit from the board.
Concluding Thoughts #
I do hope you've enjoyed my ramblings about the maths of MESBG. Please do have a play with the simulator, I hope it bring extra joy to those miraculous moments in the game where you can get a true sense of the scale of improbability of what's just happened.
Any suggestions or improvements you'd like to see to the simulators, please do let me knw. You can join the Siege Ladder Discord Server too and share your results and ideas.